[Spring] spring boot 기초_ DB와 연동하기
2021. 3. 3. 14:41ㆍWeb_Back-end/Spring

- Oracle
- mybatis
- web
listGoods.do 요청에 따른 상품목록 출력하는 어플리케이션 만들기
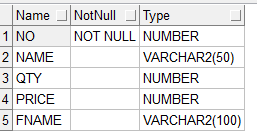
goods 테이블을 사용해, DB와 연동해보기
spring starter project 생성
- 프로젝트 생성 _ next
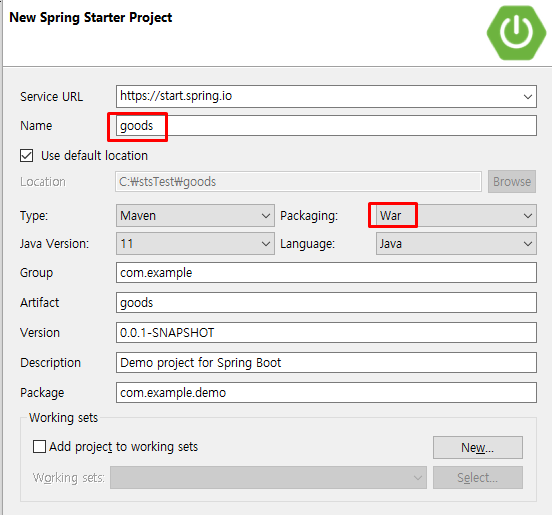
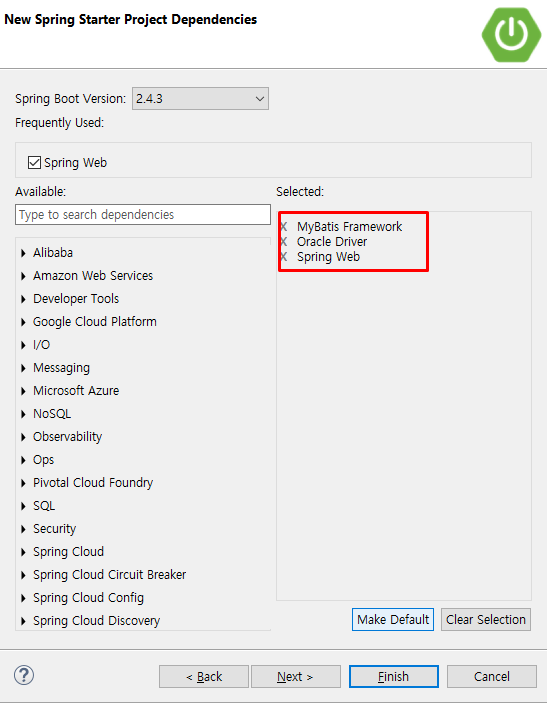
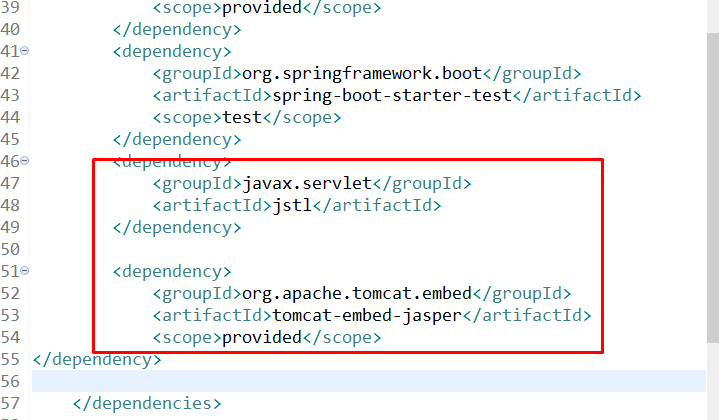
- 사용할 환경에 대한 jar파일 체크
- web + mybatis + oracle
Vo 생성
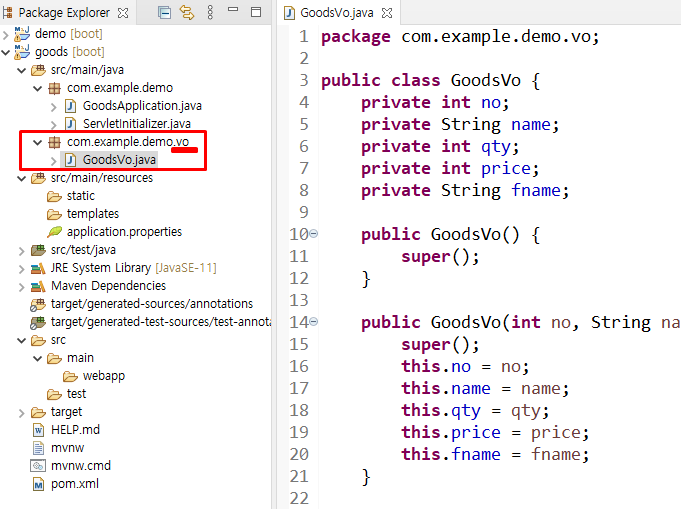
GoodsVo.java
package com.example.demo.vo;

public class GoodsVo {
	private int no;
	private String name;
	private int qty;
	private int price;
	private String fname;

	public GoodsVo() {
		super();
	}

	public GoodsVo(int no, String name, int qty, int price, String fname) {
		super();
		this.no = no;
		this.name = name;
		this.qty = qty;
		this.price = price;
		this.fname = fname;
	}


	public int getNo() {
		return no;
	}

	public void setNo(int no) {
		this.no = no;
	}

	public String getName() {
		return name;
	}

	public void setName(String name) {
		this.name = name;
	}

	public int getQty() {
		return qty;
	}

	public void setQty(int qty) {
		this.qty = qty;
	}

	public int getPrice() {
		return price;
	}

	public void setPrice(int price) {
		this.price = price;
	}

	public String getFname() {
		return fname;
	}

	public void setFname(String fname) {
		this.fname = fname;
	}

}
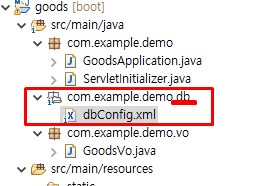
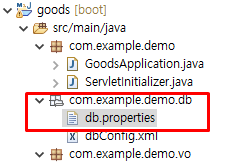
db
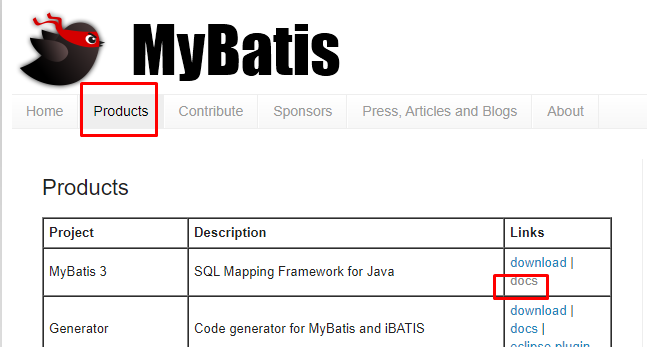
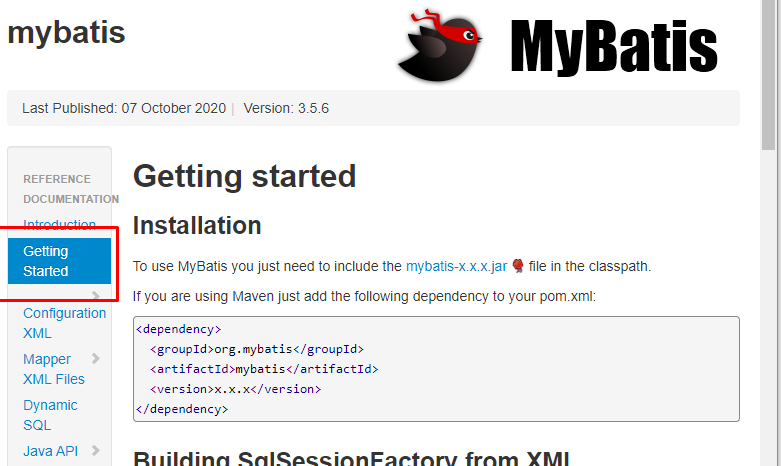
mybatis 공식홈페이지 접속
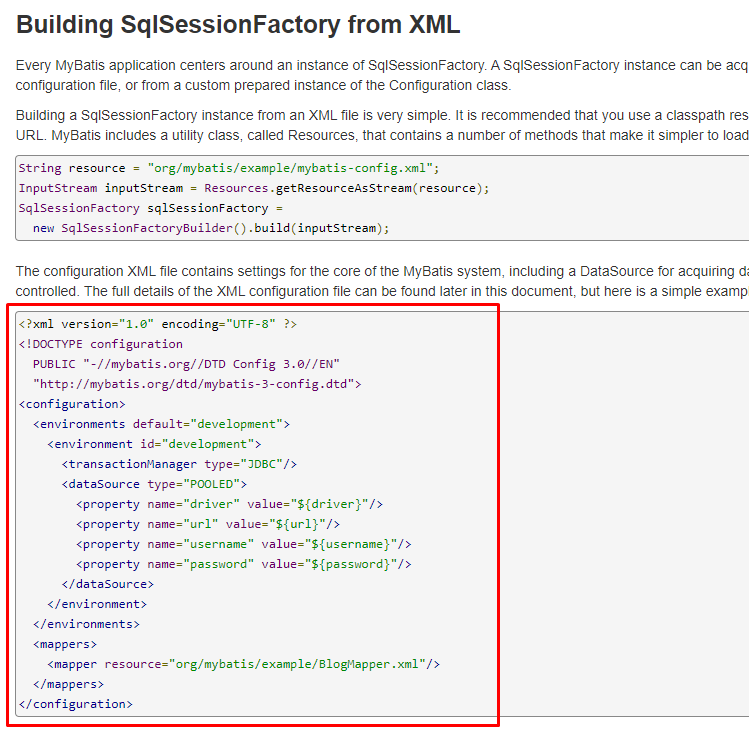
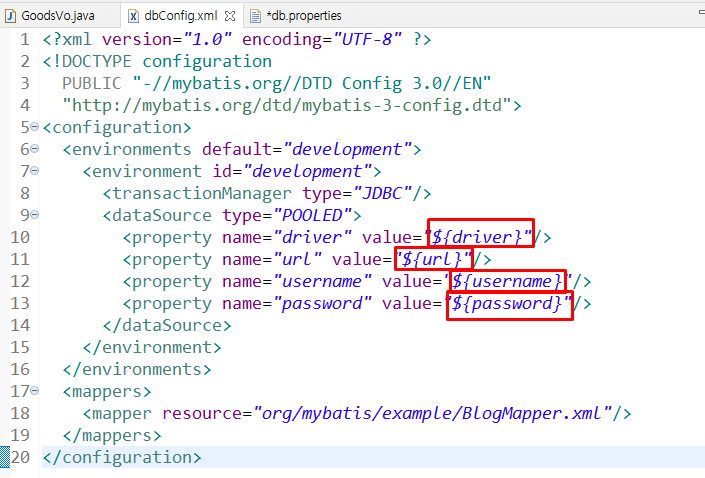
위의 소스코드를 복사하여, xml 파일(dbConfig.xml)에 붙여넣는다
- db연결 환경설정 xml 파일의 변수에 값을 넣을 properties 파일을 생성한다
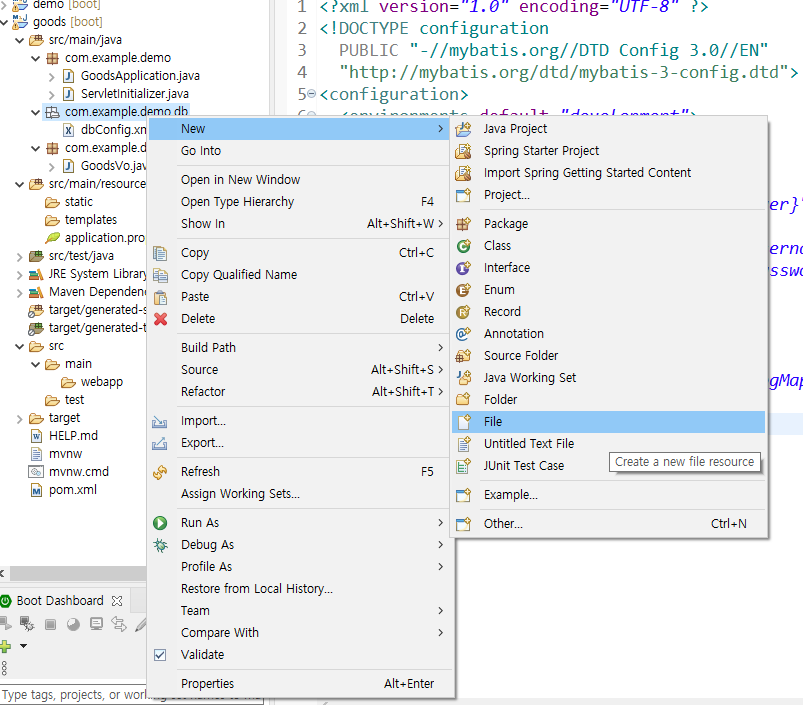
- 파일명은 아무거나, 확장자를 .properties 로 설정한다
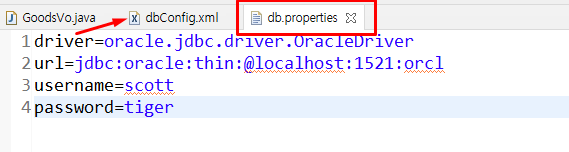
dbConfig 파일의 변수에 해당하는 값을 properties에서 설정한다
dbConfig.xml
db.properties
- 다시 dbConfig.xml 파일로 돌아가서, properties 경로를 설정한다
dbConfig.xml

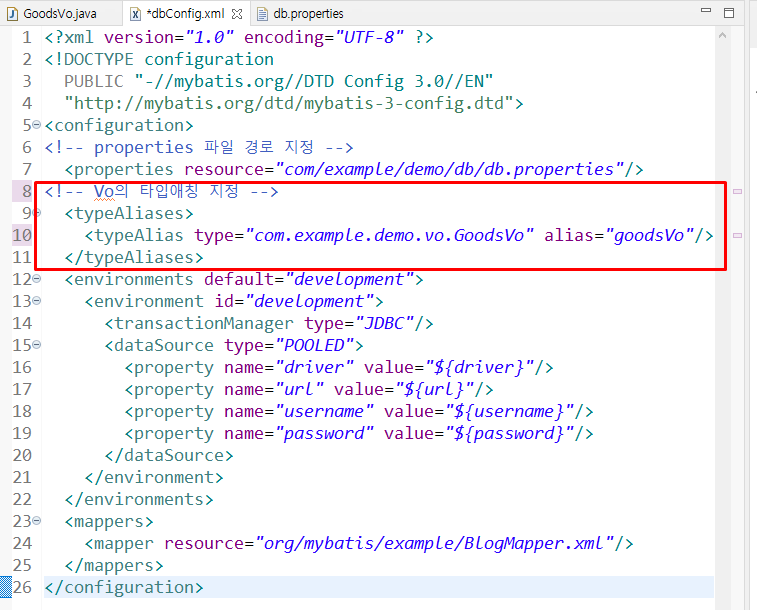
- vo에 대한 type alias 를 지정해준다
dbConfig.xml
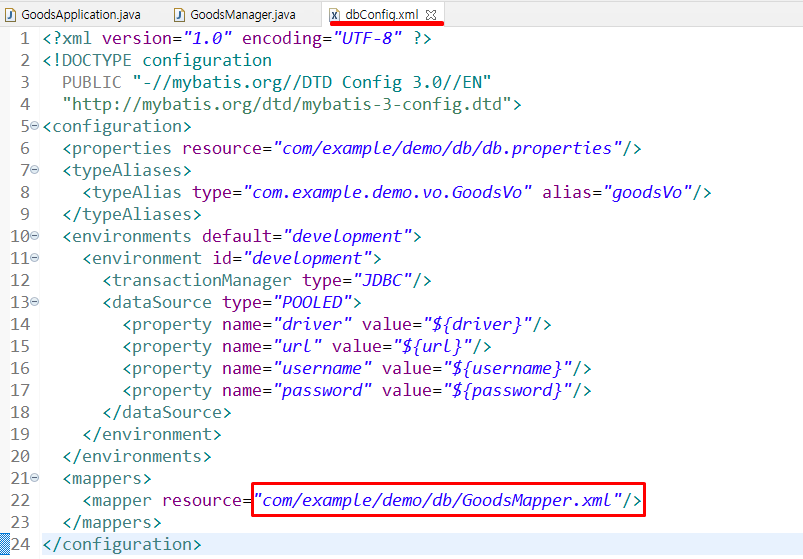
- mapping 파일 설정
- mapping 파일은 필요한만큼 추가할 수 있다
dbConfig.xml
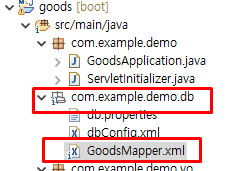
Mapping 파일 생성
- 지정해준 mapping 파일의 위치와 파일명에 맞게 mapping 파일을 생성한다
- 이 파일 안에 sql을 작성한다
- mybatis 공식사이트 방문
- product _ docs _ getting start _ Exploring Mapped SQL Statements
- 소스코드 복사, GoodsMapper.xml 파일에 붙여넣기
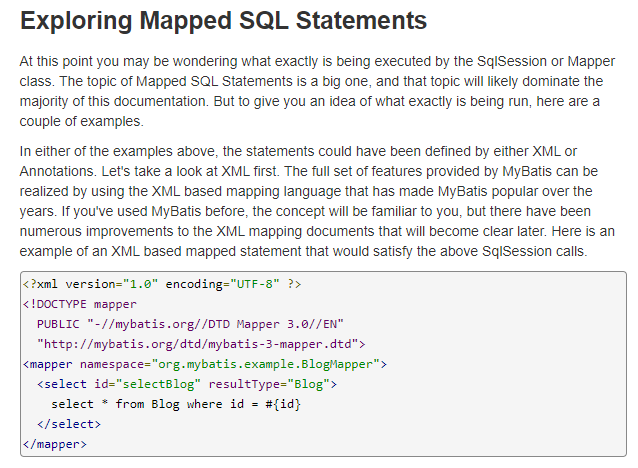
- 실행할 sql 쿼리를 작성
- id = 쿼리를 호출할 이름
- resultType = dbConfig.xml에서 alias로 설정한 이름 !!!! 동일해야한다
GoodsMapper.xml

DB연결파일 생성
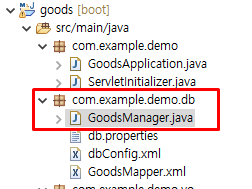
GoodsManager.java
package com.example.demo.db;

import java.io.Reader;

import org.apache.ibatis.io.Resources;
import org.apache.ibatis.session.SqlSessionFactory;
import org.apache.ibatis.session.SqlSessionFactoryBuilder;

public class GoodsManager {
	private static SqlSessionFactory factory;
	static {
		// mybatis 설정파일을 참조하는 코드작성

		try {
			// 파일을 읽어오는 객체 생성
			// mybatis가 제공해주는 Resources
			// Resources.getResourceAsReader("mybatis설정파일");
			// dbConfig안에 GoodsMapper가 포함 따라서, dbConfig 위치를 설정해준다
			Reader reader =
					Resources.getResourceAsReader("com/example/demo/db/dbConfig.xml");
			// SqlSessionFactory 생성
			// new SqlSessionFactoryBuilder().build(reader);
			factory = new SqlSessionFactoryBuilder().build(reader);
			// 스트림 닫기
			reader.close();

		} catch (Exception e) {
			System.out.println("예외발생 : " + e.getMessage());
		}

	}
}
- mapping 파일에 있는 id(findAll)을 요구하는 파일 생성하기
GoodsManager.java
package com.example.demo.db;

import java.io.Reader;
import java.util.List;

import org.apache.ibatis.io.Resources;
import org.apache.ibatis.session.SqlSession;
import org.apache.ibatis.session.SqlSessionFactory;
import org.apache.ibatis.session.SqlSessionFactoryBuilder;

import com.example.demo.vo.GoodsVo;

public class GoodsManager {
	private static SqlSessionFactory factory;
	static {
		// mybatis 설정파일을 참조하는 코드작성

		try {
			// 파일을 읽어오는 객체 생성
			// mybatis가 제공해주는 Resources
			// Resources.getResourceAsReader("mybatis설정파일");
			// dbConfig안에 GoodsMapper가 포함 따라서, dbConfig 위치를 설정해준다
			Reader reader =
					Resources.getResourceAsReader("com/example/demo/db/dbConfig.xml");
			// SqlSessionFactory 생성
			// new SqlSessionFactoryBuilder().build(reader);
			factory = new SqlSessionFactoryBuilder().build(reader);
			// 스트림 닫기
			reader.close();

		} catch (Exception e) {
			System.out.println("예외발생 : " + e.getMessage());
		}

	}

	/**
	 * Mapping 파일에 있는 findAll을 요구하는 일
	 * 그러기 위해서는
	 * 1 SqlSessionFactory로부터 session을 얻어와야한다
	 * @return
	 */
	public static List<GoodsVo> findAll(){
		// 1 mybatis를 통해서 sql을 요구할 수 있는 session을 얻어올 수 있다
		SqlSession session = factory.openSession();

		// session.selectList("mappeing파일의 namespace");
		List<GoodsVo> list = session.selectList("goods.findAll");
		return list;
	}
}
Dao 생성하기
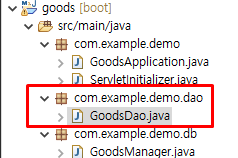
GoodsDao.java
package com.example.demo.dao;

import java.util.List;

import org.springframework.stereotype.Repository;

import com.example.demo.db.GoodsManager;
import com.example.demo.vo.GoodsVo;

// @Repository를 작성해주어야 자동으로 읽어들일 수 있다
@Repository
public class GoodsDao {

	public List<GoodsVo> findAll(){
		return GoodsManager.findAll();
	}

}
@Repository
- 스프링부트 환경에서는 사용자가 따로 환경설정파일을 만들지 않아도 된다
- 자동으로 객체를 생성해준다
- <bean id="" class=""/> 이와같은 코드를 작성하지 않아도 된다는 의미
- Dao의 경우에는, 자동으로 생성되게 하는조건
- 반드시 프로젝트 생성시에 만들어진 패키지의 하위 패키지에 클래스들을 작성해야한다
- 자동으로 생성되기 위해서는 어노테이션이 필요하다 @xxxxxx (어노테이션이 없다면 자동스캔대상이 아니다)
- Dao앞에는 자동으로 스캔하여 객체를 생성하기 위해서는 @Repository 라고 작성해야한다
Controller 생성
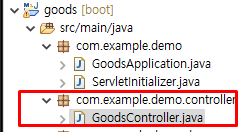
GoodsController.java
package com.example.demo.controller;

import org.springframework.beans.factory.annotation.Autowired;
import org.springframework.stereotype.Controller;
import org.springframework.web.bind.annotation.RequestMapping;
import org.springframework.web.servlet.ModelAndView;

import com.example.demo.dao.GoodsDao;

@Controller
public class GoodsController {

	// @Autowired : 의존관계 자동설정
	@Autowired
	private GoodsDao dao;

	public void setDao(GoodsDao dao) {
		this.dao = dao;
	}

	@RequestMapping("/listGoods.do")
	public ModelAndView listGoods() {
		ModelAndView mav = new ModelAndView();
		// view이름을 지정하지 않아도, 요청하는 이름과 같은 view파일을 찾는다
		// 즉, setViewName("listGoods") 하지 않아도 된다
		mav.addObject("list", dao.findAll());
		return mav;
	}

}
이동할 view 페이지 생성하기
- webapp _ WEB-INF _ views 폴더들을 생성해서 그 안에 생성해주어야한다
- 이름은 요청하는 listGoods.do와 같이 listGoods.jsp 로 작성한다

- JSP파일을 read하기 위한 사전 설정
- 아래 내용 참고
2021/03/03 - [분류 전체보기] - [Spring] Spring boot 시작해보기
[Spring] Spring boot 시작해보기
STS : spring tool suite spring boot : 스프링 개발을 빠르게(쉽게) 할 수 있도록 환경을 제공 spring.io/tools Spring Tools 4 is the next generation of Spring tooling Largely rebuilt from scratch, Spring..
jjiny-bbany.tistory.com
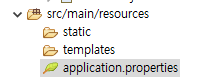
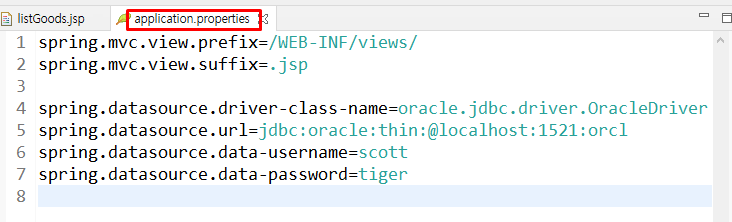
application.properties
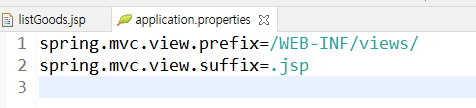
porm.xml
View _ JSP파일 작성
listGoods.jsp
<%@ page language="java" contentType="text/html; charset=EUC-KR"
    pageEncoding="EUC-KR"%>
<%@ taglib prefix="c" uri="http://java.sun.com/jsp/jstl/core" %>
<!DOCTYPE html>
<html>
<head>
<meta charset="EUC-KR">
<title>Insert title here</title>
</head>
<body>
	<h2>상품목록</h2>
	<hr>
	<table border="1" width="80%">
		<tr>
			<td>상품번호</td>
			<td>상품명</td>
		</tr>
		<c:forEach var="g" items="${list }">
		<tr>
			<td>${g.no }</td>
			<td>${g.name }</td>
		</tr>
		</c:forEach>
	</table>
</body>
</html>
DB에 대한 설정하기
아래 내용을 필요한 부분만 복사하여 붙여넣기
spring.datasource.driver-class-name=oracle.jdbc.driver.OracleDriver spring.datasource.url=jdbc:oracle:thin:@localhost:1521:orcl
spring.datasource.data-username=scott
spring.datasource.data-password=tiger
application.properties
server 가동하기

- server가동시 console창에 뜨는 오류는 무시해도 좋다
- 브라우저를 열고 localhost:8080/listGoods.do 를 요청해본다
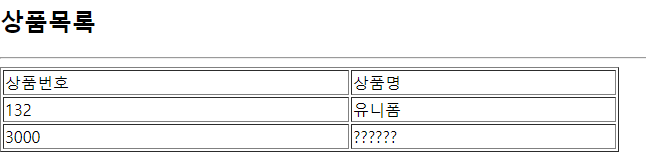
- 위와같은 목록이 view페이지에 나온다면 성공
스프링부트 $ mybatis 환경에서 DB 연동하는 순서(과정) 정리해보기
예시 - listGoods.do 요청에 따른 상품목록 출력하는 어플리케이션 만들기
- spring starter project 생성
- ------new_spring starter project------
- name : goods
- packing : war
- -------next-----------------------------
- Available 선택
- spring web
- mybatis
- oracle
- application.properties 설정
- porm.xml 설정
- GoodsVo 생성
- mybatis 환경설정
- properties file -- db.properties
- mapping file -- GoodsMapper.xml
- Configuration file -- dbConfig.xml
- GoodsManager 생성
- GoodDao 생성
- GoodsController 생성
- View Page (JSP) 생성
'Web_Back-end > Spring' 카테고리의 다른 글
| [Spring] STS / lombok 사용 (0) | 2021.03.04 |
|---|---|
| [Spring] 스프링부트 & mybatis 환경에서 DB연결 연습 2 (0) | 2021.03.03 |
| [Spring] Spring boot 시작해보기 (0) | 2021.03.03 |
| [Spring] mybatis 초기설정하기 (0) | 2021.03.02 |
| [Spring] DI _ 어노테이션 기반 객체 생성 (0) | 2021.02.25 |